以ONOS+Mininet建立基本Topology與Flow Table
以ONOS+Mininet建立基本Topology與Flow Table
本文以官方WiKi - Basic ONOS Tutorial[1]為基底,修改並建立自定義的topology及flow table rules。
安裝系統
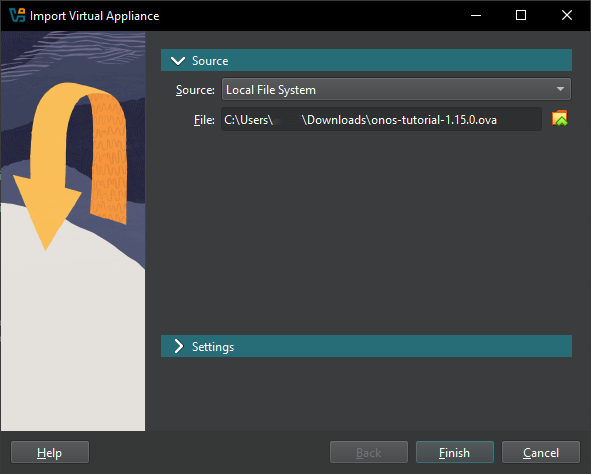
請先下載教學用OVA,並以VirtualBox建立系統。下載完畢後,可直接以VirtualBox開啟.ova檔案,將自動匯入系統設定,如下圖。
預設帳號密碼
帳號:onos
密碼:rocks
建立ONOS Cluster
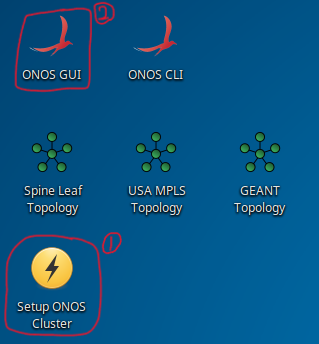
在系統桌面上點選Setup ONOS Cluster(下圖第1步)以建立範例Cluster。完成後,點選ONOS GUI(下圖第2步)以開啟ONOS WebUI。
在指定Cluster中以Mininet建立自定義Topology
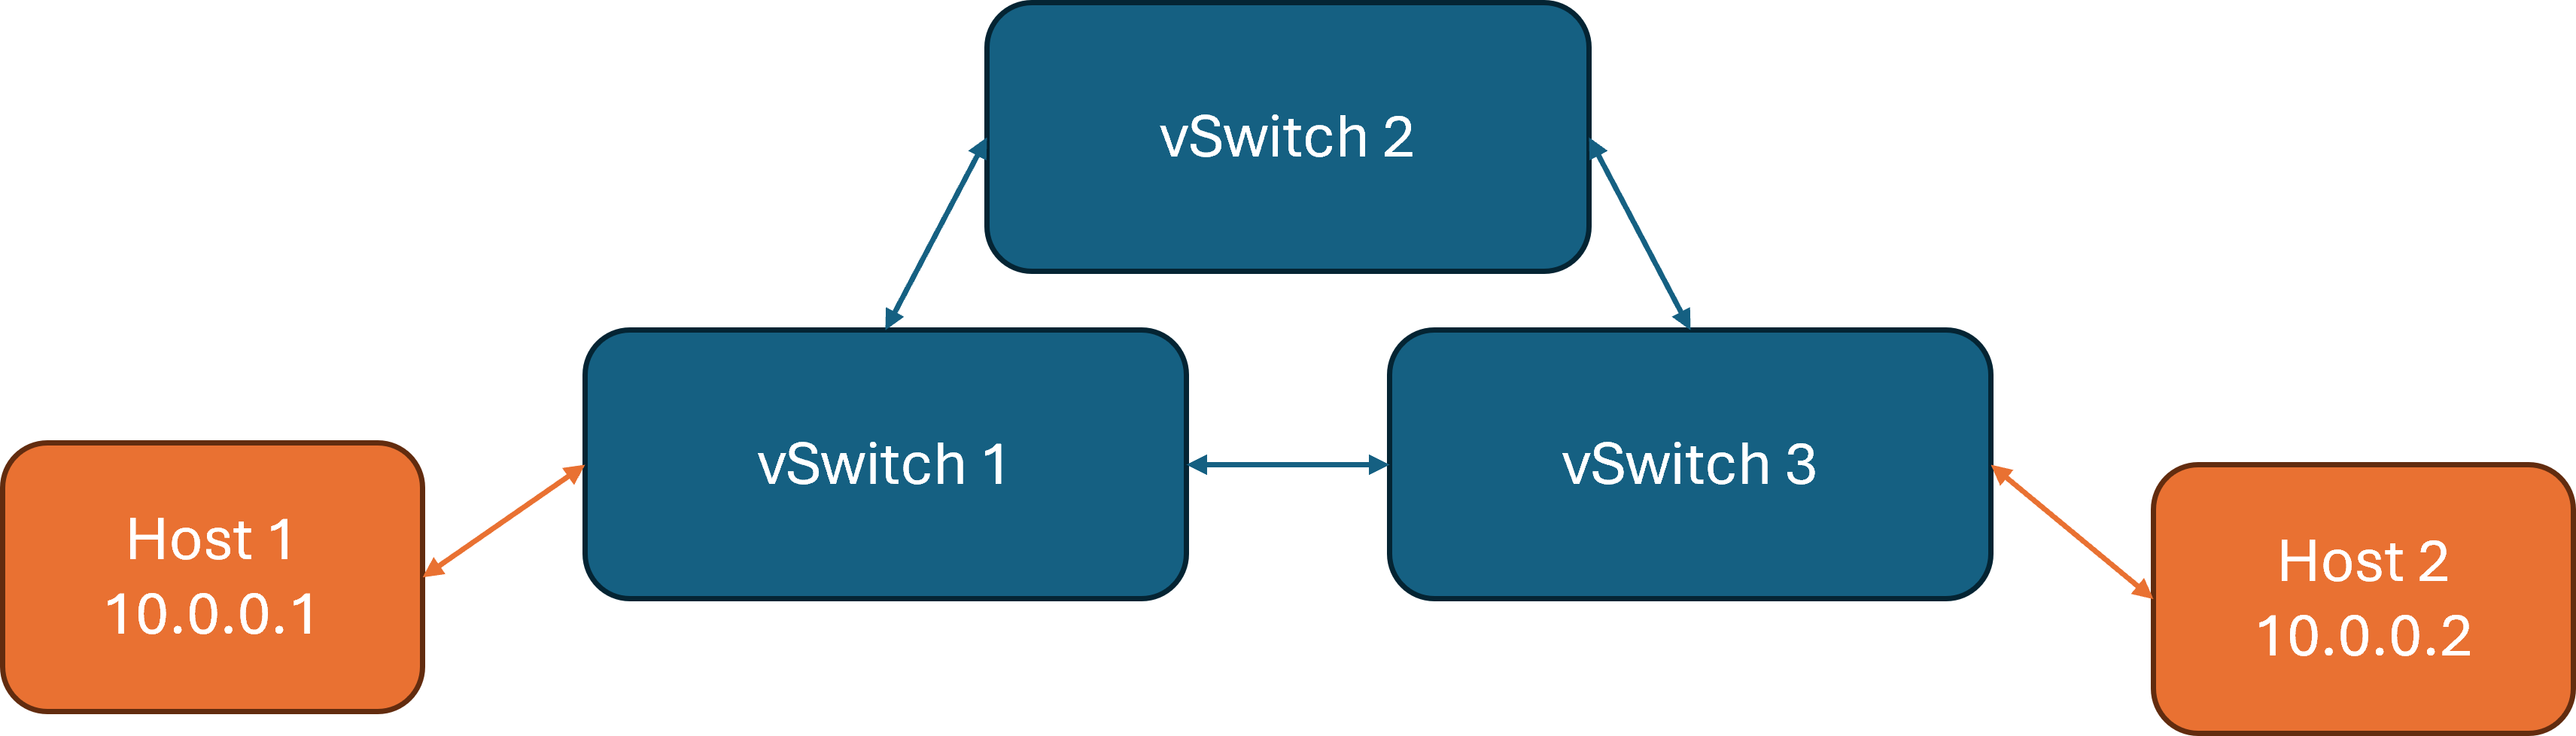
在本範例中,我們預計建立一個如下圖的triangle topology,包含3個vSwitch、2個host及1個controller,其中各host被分配到1台vSwitch底下。
要以Mininet建立自定義的topology,可利用python撰寫一個簡易的Topoclass。其中,使用self.addHost()及self.addSwitch()可定義host及vSwitch節點,而self.addLink()可將兩節點之間建立連線。最後,可用lambda函式來定義topology名稱。完整程式如下:
# topology.py
from mininet.topo import Topo

class TopoTri(Topo):
    def build(self):
        # Add hosts and switches
        leftHost = self.addHost('h1')
        rightHost = self.addHost('h2')
        leftSwitch = self.addSwitch('s3')
        rightSwitch = self.addSwitch('s4')
        centerSwitch = self.addSwitch('s5')

        # Add links
        self.addLink(leftHost, leftSwitch)
        self.addLink(leftSwitch, rightSwitch)
        self.addLink(leftSwitch, centerSwitch)
        self.addLink(centerSwitch, rightSwitch)
        self.addLink(rightSwitch, rightHost)

topos = {'topo_tri': (lambda: TopoTri())}
建立topology script後,以下列指令開啟Mininet。須注意remote controller IP需與ONOS WebUI顯示的cluster其中一個IP相同。此時可回到WebUI查看建立完成的topology。
sudo mn --mac --switch ovsk,protocols=OpenFlow13 --controller=remote,ip=172.17.0.5 --custom ./topology.py --topo topo_triONOS WebUI快捷鍵
L: 顯示vSwitch的Device ID
H: 顯示host節點(需要host有互動後才會顯示,EX: ping)
A: 切換traffic flow的顯示模式(pps, bps, bytes)
設定Flow Tables
Reactive Forward
此時在mininet以下列指令測試h1到h2之間的ping,會發現packet無法正常發出,這是因為我們還未設定各vSwitch的flow rules。
# at mininet
mininet> h1 ping h2
PING 10.0.0.2 (10.0.0.2) 56(84) bytes of data.
^C
--- 10.0.0.2 ping statistics ---
10 packets transmitted, 0 received, 100% packet loss, time 9006ms
我們可以在ONOS CLI中開啟reactive forward應用,使各vSwitch自動判定packet forwarding:
# at onos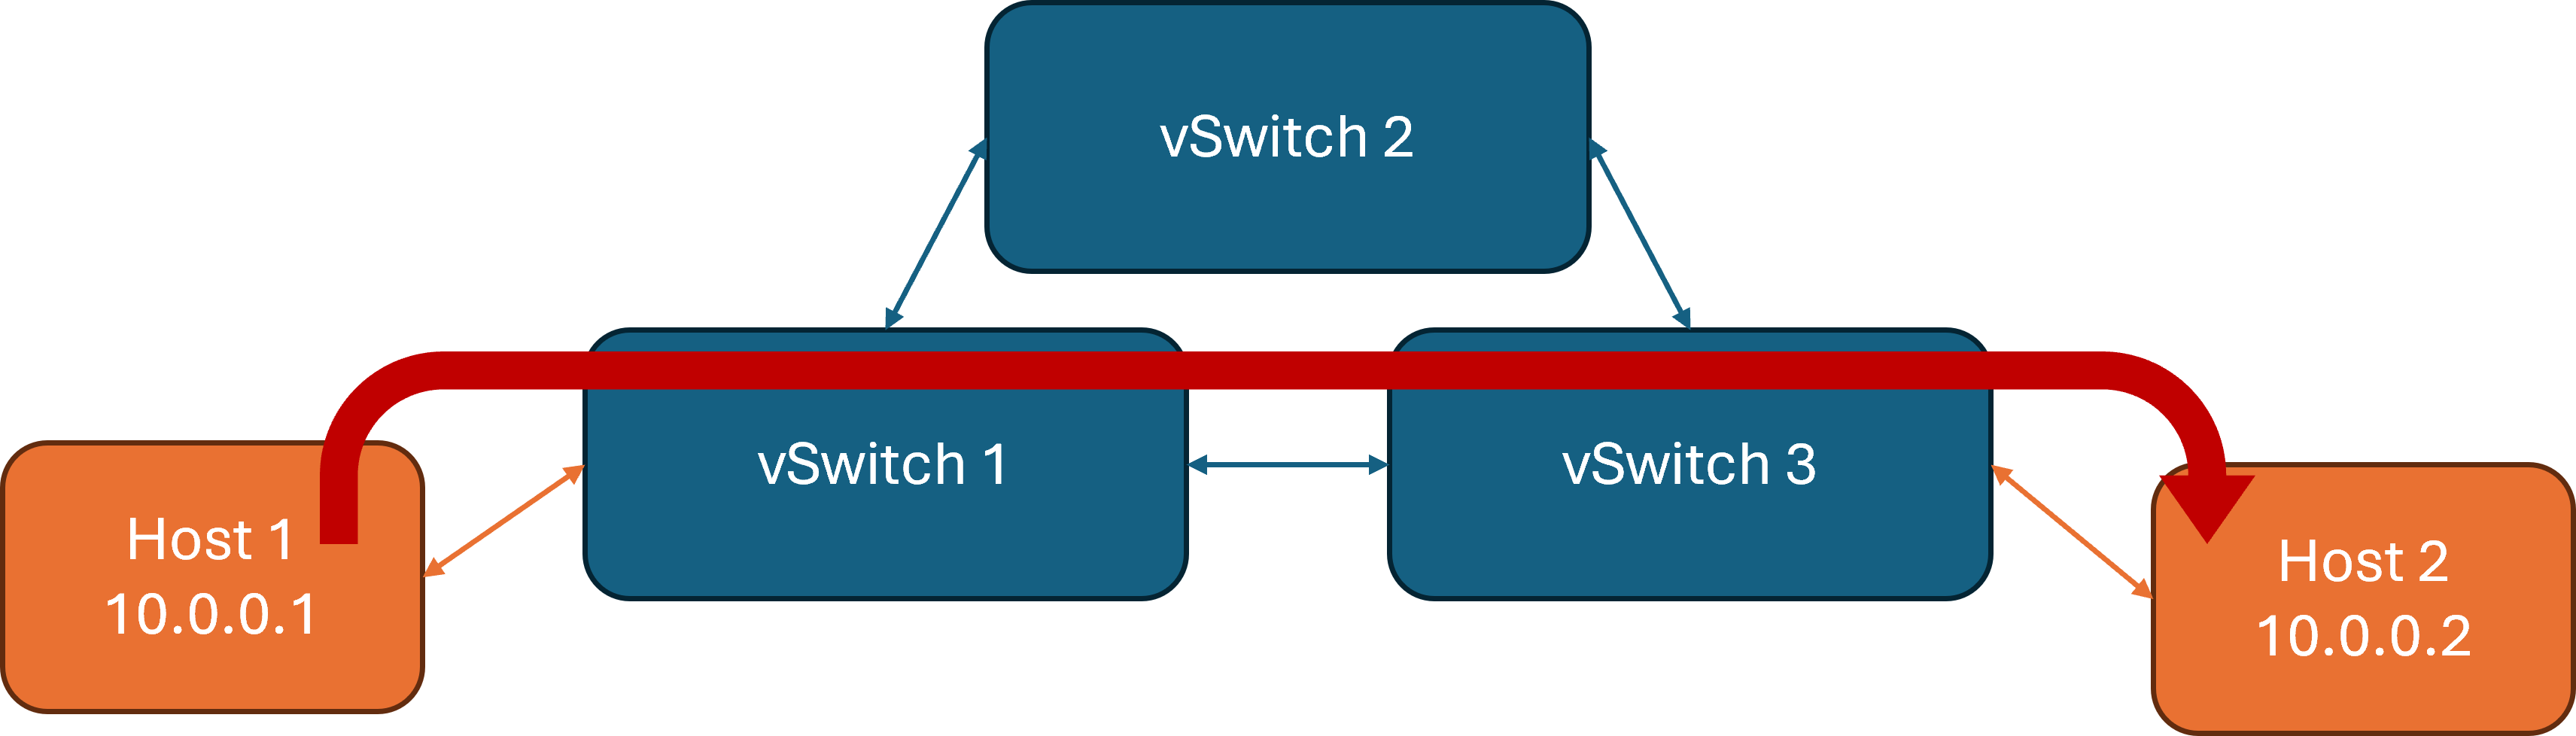
onos> app activate fwd此時在Mininet中執行h1 ping h2測試,可以發現封包自動從距離較短的路徑發送。
自定義Flow Tables
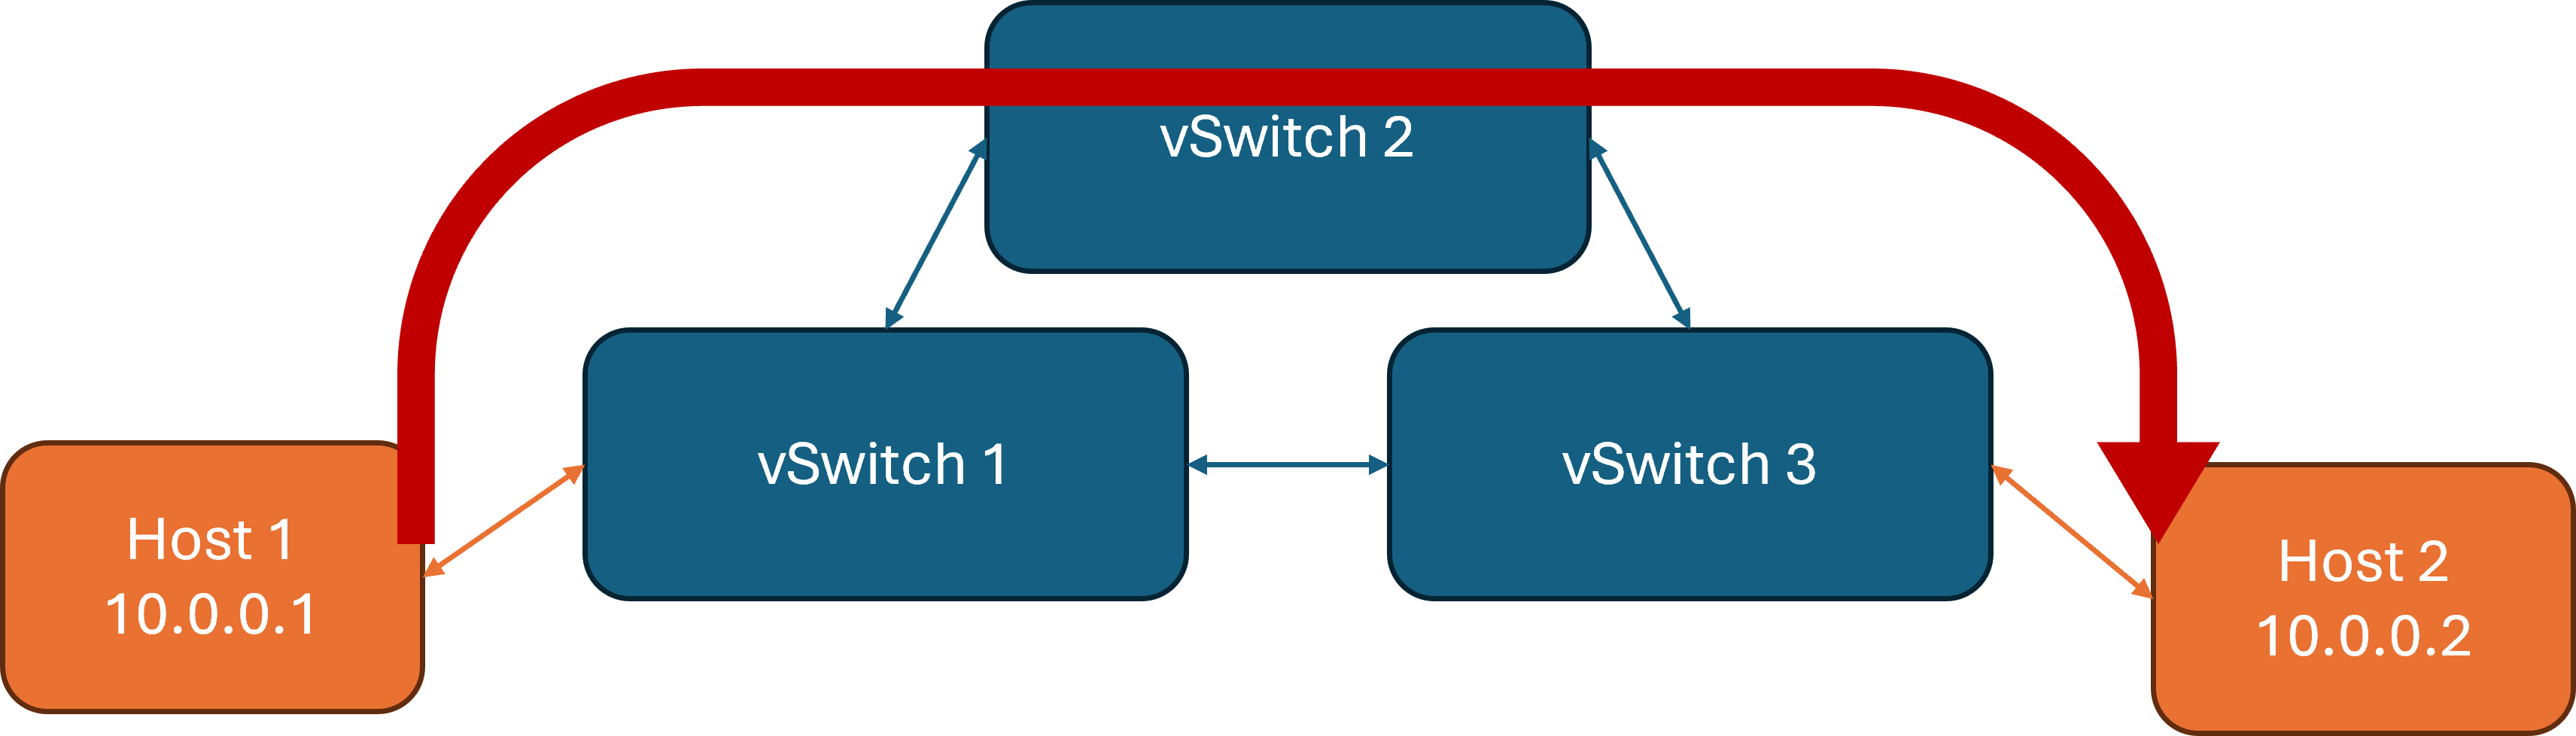
在本範例中,我們將撰寫一份自定義的flow rules,讓packet走較長的路徑(h1->s1->s2->s3->h2)。其中,我們可指定某個vSwitch(deviceId)允許接收到來自指定port且destination為某host的MAC address的封包後,向另一個指定port轉送。
在如下的rules.json範例中,我們需要在各vSwitch的flow table建立雙向的packet forwarding規則,來讓ICMP協定可順利傳輸。
rules.json (點擊展開)
{
  "flows": [
    {
      "priority": 60000,
      "timeout": 0,
      "isPermanent": true,
      "deviceId": "of:0000000000000003",
      "treatment": {
        "instructions": [{"type": "OUTPUT", "port": "3"}]
      },
      "selector": {
        "criteria": [
          {"type": "IN_PORT", "port": "1"},
          {"type": "ETH_DST", "mac": "00:00:00:00:00:02"}
        ]
      }
    },
    {
      "priority": 60000,
      "timeout": 0,
      "isPermanent": true,
      "deviceId": "of:0000000000000003",
      "treatment": {
        "instructions": [{"type": "OUTPUT", "port": "1"}]
      },
      "selector": {
        "criteria": [
          {"type": "IN_PORT", "port": "3"},
          {"type": "ETH_DST", "mac": "00:00:00:00:00:01"}
        ]
      }
    },
    {
      "priority": 60000,
      "timeout": 0,
      "isPermanent": true,
      "deviceId": "of:0000000000000005",
      "treatment": {
        "instructions": [{"type": "OUTPUT", "port": "2"}]
      },
      "selector": {
        "criteria": [
          {"type": "IN_PORT", "port": "1"},
          {"type": "ETH_DST", "mac": "00:00:00:00:00:02"}
        ]
      }
    },
    {
      "priority": 60000,
      "timeout": 0,
      "isPermanent": true,
      "deviceId": "of:0000000000000005",
      "treatment": {
        "instructions": [{"type": "OUTPUT", "port": "1"}]
      },
      "selector": {
        "criteria": [
          {"type": "IN_PORT", "port": "2"},
          {"type": "ETH_DST", "mac": "00:00:00:00:00:01"}
        ]
      }
    },
    {
      "priority": 60000,
      "timeout": 0,
      "isPermanent": true,
      "deviceId": "of:0000000000000004",
      "treatment": {
        "instructions": [{"type": "OUTPUT", "port": "3"}]
      },
      "selector": {
        "criteria": [
          {"type": "IN_PORT", "port": "2"},
          {"type": "ETH_DST", "mac": "00:00:00:00:00:02"}
        ]
      }
    },
    {
      "priority": 60000,
      "timeout": 0,
      "isPermanent": true,
      "deviceId": "of:0000000000000004",
      "treatment": {
        "instructions": [{"type": "OUTPUT", "port": "2"}]
      },
      "selector": {
        "criteria": [
          {"type": "IN_PORT", "port": "3"},
          {"type": "ETH_DST", "mac": "00:00:00:00:00:01"}
        ]
      }
    }
  ]
}
在新的terminal中(非onos或mininet),我們可以利用 ONOS 的 RESTAPI 來將撰寫好的flow rules部屬到mininet中:
curl -X POST --user onos:rocks -H "Content-Type: application/json" -d @rules.json http://172.17.0.5:8181/onos/v1/flows再次以h1 ping h2測試,可觀察到packet按照定義好的flow rules被轉發,如下圖:
請先將fwd關閉來測試
onos> app deactivate fwdReferences
“Basic ONOS Tutorial - ONOS - Wiki,” Onosproject.org. [Online]. Available: https://wiki.onosproject.org/display/ONOS/Basic+ONOS+Tutorial. [Accessed: 06-Oct-2025]. ↩︎